last night, i finished weaving the square footage needed for the mini golf hole! it was more exciting and relieving than i could have predicted, even though we still have a lot of work to do making hazards and pulling the whole piece together. nevertheless, i poured myself a nice, cold, new belgium mothership wit at the end, sat down to a super delicious dinner of chicken marsala (thank you, lisa!) and basked in the glory for at least an hour afterwards. Continue reading
Posts Tagged ‘shot’
29 May
weaving the bedrock+ water hazard
i’m using a diamond twill for the bedrock:
here it is wrapping up on the front beam:
the warp has four colors:
i’m using an extended herringbone twill + random warp for the water hazard. the orange cord you see below is used for the first few shots to spread out the warp (when you tie it on the front beam, the ends extend in a narrow manner that needs to become regular before weaving). next, i throw a number of shots to get the fabric going, then stop to hemstitch the ends so the fabric doesn’t unravel when i take it off the loom.
mental note: i really need to take the time stamp off the new camera.
22 May
how to warp an earthy loom from front to back, abridged
1. tie the bouts you’ve measured to the front beam.
2. sley the reed.
3. thread your heddles:
4. as you’re threading your heddles, tie every ten ends with a knot:
5. tie your knotted ends to the back apron rod.
6. beam your warp (wind it up on the back beam). make sure you pull it tight every few turns, and separate the threads with stiff paper or sticks:
7. tie eight ends at a time to the front apron rod with surgeon’s knots:
6. tighten and re-tighten all your knots to give an even tension over the warp:
7. throw a couple shots of thicker or doubled-up yarn to spread the warp out. these shots will be pulled out in the end:
8. ok: now weave! yalla, indeed!
18 May
the herringbone grass
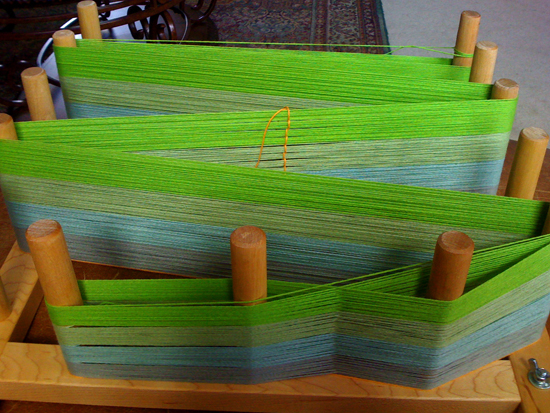
my second strip of grass is going to be woven in a herringbone twill with a color-graduated warp. here’s the first bout (first 150 ends of the 300 ends i need) measured out on the warping board:
the high-tech little method below is what i use to keep track of the count. for every 10 ends, you wrap the yarn. i need 150, so 15 wraps will do me. the yellow thread at the very bottom is my guide for wrapping on the warping board… for instance, if i need 3.2 yards, i measure a guide thread to that length, figure out the path between pegs that works perfectly, then follow that path for my measuring.
next is a photo i took with a cool little iphone app named hipstamatic that my sister turned me on to. yeah, its fun, but i quickly realized it doesn’t serve the purpose of clear documentation very well. in any case, this is the second bout measured out, and you can see i’m beginning to tie it up with all the various knots that help keep it from tangling up after its taken off the warping board.
below is the first shot of green, and you can see the herringbone pattern and graduated colors of the warp. to get this pattern, i had to switch up the threading of the heddles from 1-2-3-4-1-2-3-4 (straight) to 1-2-3-4-3-2-1 (point). the new threading took me quite a while to get used to, and i spent a fair amount of time double- and triple-checking my work, making it go pretty slow.
then, to make matters worse, i hadn’t foreseen that, compared to a straight threading, double the amount of heddles would be needed on shafts 2 and 3, and about half as many on shafts 1 and 4. i noticed this when i was about 3/4 done threading the first bout, but waited til i had used up all the heddles on shafts 2 and 3 before moving some over from shafts 1 and 4. can you say HUGE pain the ass? it is WAY easier to move heddles when you don’t have over half of them threaded. blah.
this is my weavie helper, mahana, making sure the weft yarn on my shuttle doesn’t get out of hand.


